
How to create a schedule easily?
Our scheduling solutions allow you to organize your business events on a daily basis.Managing the organization of your meetings, service events and staff becomes as easy as it gets and, thanks to our tools, you can also share this information with the people of your choice.
This tutorial leads you step by step through the creation of your collaborative schedule and teaches you how to plan easily.
How can you to test?
PlanningPME is a schedule not only dedicated to small and medium-sized enterprises but also to major accounts from any business sector. It will contibute perfectly to the growth of your business.
You can download a trial version at this address:
This version is limited to 30 openings/closures and the creation of 200 events and 50 clients.
A multi-step wizard helps you set up the software.
Vocabulary used in the scheduling software
What is a human resource?
A human resource is a human being: Employee, manager, technician, etc.
What is a material resource?
A material resource may be: a meeting room, a vehicle, a computer or any other kind of equipment the use of which you wish to manage.
What is an event?
An event is a mission or a work item to be carried out by a human or material resource. An event is represented in the schedule by a colored rectangle. An event may be: a meeting, a technical assistance operation, an appointment or any other mission that is particular to your business activity.
What is an unavailability?
Unavailability arises when a resource is unable to be used, for example, for reasons of absence or breakdown/maintenance. An unavailable human resource may arise from planned leaves, sickness, maternity leave, time off in lieu, etc.
What is a To plan resource?
A To plan resource is a kind of Post-it. This attribute is given to any task that cannot, for the moment, be assigned directly to a human or a material resource. In effect, this creates a list of activity items waiting to be assigned.
What is a department?
A department comprises a group of human and/or material resources. A department may be for technical, administrative, sales activities, etc. In addition, a filter is available in the scheduling system enabling schedule by department.
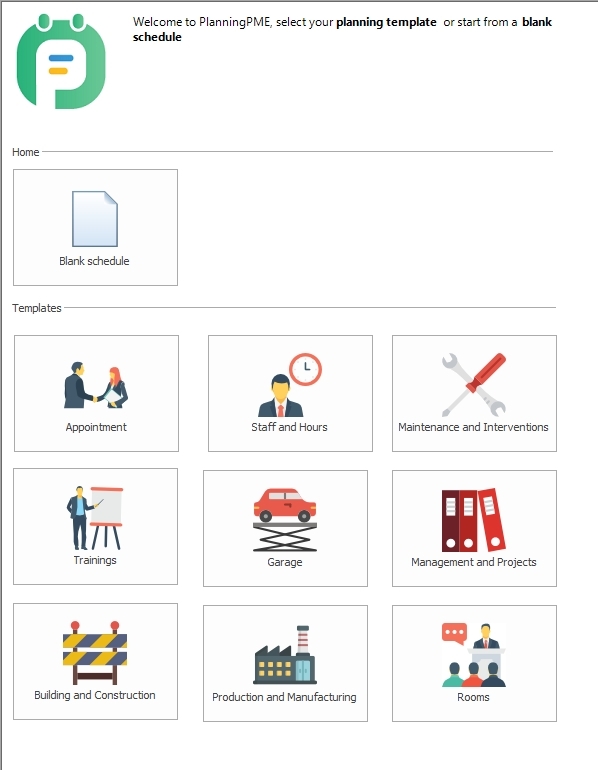
Create your schedule from an already set up example
When launching PlanningPME, you can either check existing samples or set up a blank schedule.
To check an example that has already been set up, click on the icon that matches your needs.
The example contains events, resources, unavailabilities
Create your schedule from a blank schedule
To create your own schedule, go to the menu "File" -> "New planning". Choose a file name and save your schedule to the desired location.
A multi-step wizard helps you set up the software. Follow the steps one by one and choose the options that match your schedule. Whatever answers you give to these questions, you will be able to change your parameters afterwards.
You're done setting up the software. Here is the schedule that appears on your screen:

Customize your resources
When first opening, the schedule it displays in Resources view. Each row displayed represents the schedule for a resource whose name appears in the left column. To customize your human and material resources, double-click on a name in the left column.
The resource window displays:

For each resource in your schedule, choose whether it is a human, material, or a "to plan" one, specify the various information specific to each one of them, and set a background and text color if you want to.
Changes to the schedule will appear as soon as you save a file.
Convenient: With a simple drag/drop you can change the order of your resources on the schedule.
Plan your events
The events: On the schedule, an event is represented by a full color rectangle.
Different ways to create an event
- Draw a rectangle on the schedule using your mouse.
- Double-click on a blank area of the schedule.
- Right click on a blank space on the schedule and choose "New event".
In these three cases, the "Event " window appears:

- Enter a label for your event: "Appointment" for example.
- Choose the resource(s) assigned to this event.
- Choose the dates and times for this event and then validate.
The "Appointment" event has been assigned to the selected resource(s). Create other events on the schedule the same way.
You can create your events directly on the schedule.
Manage absences and unavailabilities
Absences / unavailabilities: A case of unavailability is represented in the schedule by a hatched colored rectangle. This indicates, for example, that a resource is absent or that some equipment has broken down or otherwise unavailable.
Different ways to create an unavailability
- Draw a rectangle on the schedule using your mouse by holding down the CTRL key.
- Right click on a blank space on the schedule and choose "New Unavailability".
In any case, the "Unavailability" window will appear.

The principle for creating unavailabilities is the same as for creating events. Use the "Data "-> "Unavailability" menu to access the list of your unavailabilities.
Filter by department
From your full schedule and for improved visibility, you can extract the schedule of a single service.
Open the "Data" -> "Service" menu
Click on "Add", name your service, for example, "Sales department" and select all resources to assign to this service.

Resulting display on the planning: When selecting "Sales department" from the drop-down menu, only the sales department resources appear on the schedule.
Customize information displayed on the task
You can customize the data displayed on the screen from the menu "View" -> "Description"
- Event: Boxes that represent events
- Tooltip: Fields on the yellow tooltip that appear when you hover your mouse on a job.
The selected information is thus adapted to your personal working diary.
Make your daily activities easy-to-schedule thanks to those features
Now, you have the basics to use PlanningPME. Easy to use, PlanningPME enables you to manage your resources and events easily and efficiently.
Now, depending on your business and needs, you can set up further interesting options, among which:
- clients
- Projects
- skills
- Filters
- Custom fields
- Reports
- Search
- Users rights